
Catalog and customer services
Complete manual for selecting, configuring, assigning, and managing a customer service.
Last updated: 2026-09-29
Public service page
Under Services → Settings → Services, open a saved service and its Public page tab. This page presents the offer and collects contact requests without customer sign-in or E-Commerce. The Services module and read permission are required; saving, images and request updates require service write permission.
Enter a commercial title, short and full descriptions, features and frequently asked questions. The public title can differ from the internal name. Choose an address using lowercase letters, numbers and hyphens. The single Save button saves changes across all tabs, including the public page. Before the first image upload, select Draft and press Save, then upload a cover and up to eight PNG, JPEG or WebP gallery images, each within 4 MB and 24 megapixels. Press the same Save button to apply the selected images as well. Upload the shared logo once under Settings → Public pages → Public page identity; it is used by the catalog and every offer. With a cover, choose Logo position: top-left, top-right, bottom-left or bottom-right. The logo sits over the photo inside a solid white corner, with a broad curve facing the photo, without repeating the ISP name. On phones, the logo and white curve are more compact to leave more of the photo visible while keeping the selected corner. Existing pages initially retain the top-left corner. Embedded presentations do not display the logo. Keep important text away from that corner. The name is shown when no logo is available; without a cover, a simple header remains. The cover fills the presentation in a 16:9 format. Recommended size: 1920 × 1080 px. Images with different proportions are centre-cropped without stretching: keep the subject centred and the selected corner clear for the logo.
Show or hide prices and choose VAT-inclusive or VAT-exclusive amounts. Under Prices to show, choose One price and the desired billing cycle, or All available prices. The selection also applies to embedded presentations. New editors suggest one price; previously configured pages retain all prices until you change this choice. Prices and activation fees follow the saved service price list; when no VAT rate is available, amounts are labelled VAT-exclusive. If you remove the selected cycle from the price list, no other price replaces it: select a new cycle in the public page settings. These are not the personalised terms of an individual customer.
Match the design to the cover
Under Page appearance → Page colours, choose Automatic from cover to coordinate buttons, accents and background with the image colours. The suggested colours are shown before saving. The title and price remain separate from the photo. Avoid important text near the cover edges, where it may be cropped; the logo occupies the corner selected under Logo position. Use a good-resolution image consistent with the offer terms.
Alternatively, choose Public page colours or Custom. To customise the primary and background colours, press the colour swatch or pencil and choose a colour in the picker. You can also enter a colour code; clearing it restores the public page colour for that field. Heading style can be automatic, Modern, Rounded or Elegant. Without a cover, or if its colours cannot be extracted, Public page colours are used. To apply automatic styling to an existing cover, open the Public page tab, wait for the suggestion and press Save. Then review the preview, including on a phone. Styling does not change prices, descriptions or commercial terms.
Public offer catalog
The optional Website field under Public page identity adds a Visit website button on the right of the catalog header, opposite the logo, with the title and introduction underneath. On individual offers it appears beside Check coverage on individual offers (or Request contact when no coverage checker is available). On offer pages it has a white background, a light border and the same height as the primary button, with spacing between the two actions; the buttons stack on phones. Enter a complete address, such as https://www.example.it, and use the same Save button. The link opens a new tab. Clear the field and save to hide the button; embedded presentations do not display it. HTTP or HTTPS addresses without credentials are accepted.
Open Services → Settings → Public pages, the last tab after Service types. The catalog brings your ISP’s offers together under one link to share with customers or add to your website. Each card opens its individual offer page, where visitors can read details, check coverage where available and request contact.
- Prepare and save the Public page for each service you want to offer.
- In Public pages settings, choose a title, introduction and initial view: Grid or List. Visitors can switch views.
- Under Choose offers to display, search services and enable Show in catalog. Enter a position from 1 to 9999: lower numbers appear first. Up to 1000 offers can be selected; choices persist across table pages and filters.
- Complete the common Privacy Policy URL, choose Published and select Save. One button saves the catalog and Privacy and cookies settings together.
- Use Open preview to view saved settings and Copy link to share. New catalogs start unpublished.
Only published pages of active, non-deleted services available separately are displayed. You may select a draft in advance: it appears only once published and available. Removing a page from the catalog does not disable its direct link; unpublishing the catalog does not suspend individual offers. Offers with equal positions retain a stable order.
Under Public page identity, upload the shared Logo: PNG, JPEG or WebP, up to 4 MB and 24 megapixels. Upload and Remove work like offer images; press Save to apply changes. This single logo is used by the catalog and all offers, replacing previous individual logos. Without a logo, the ISP name is displayed. Choose the primary button colour, page background and accent colour using the swatch or pencil: they are independent of the Customer Area. Individual offers can use these colours or retain cover-based or custom colours.
Under Catalog style, choose Essential for a compact header, Visual for a broad introduction and large images, or Elegant for editorial headings and more space. Thumbnails help you choose; Open preview shows the page after saving. Edit the title and use Jodit for the introduction, with paragraphs, headings, lists, links and formatting. The default introduction invites visitors to find a suitable offer and request contact; previously saved introductions are preserved. Do not insert images or scripts into the introduction.
Browser tabs for the catalog and individual offers display the configured ISP APP icon; if absent, they use the page logo or, when neither is available, the default icon. Each card reuses the offer image, title and short description; prices, selected billing cycle and VAT wording follow the same settings as the individual page. A single selected price remains single, all prices remain visible when chosen, and hidden prices remain hidden. A deleted billing cycle is not replaced with another price.
Grid and list views adapt to phones, with 12 offers per page and a dedicated empty state when no offers are available. Published catalogs require no login. Privacy, Cookie Policy and iubenda preferences follow the common settings; the banner is disabled in previews. Preview card links open individual offer previews, which do not submit requests.
Configuration requires a full administrator with service write permission; operators with read permission can inspect settings. If another operator has saved changes meanwhile, reload before trying again. For a missing offer, check selection, page status and service availability.
Embed the grid in your website: under Share the catalog, use Copy grid code and Grid preview. Paste the code into an HTML block that accepts scripts or give it to your website manager. It displays only the cards, with pagination when needed, without a logo, heading, introduction or footer. It always uses a grid even when the public catalog starts in List view. Width and height adapt to the available space. Offers open their full page in a new tab. The catalog must be published; saved changes do not require copying the script again. The host website manages its own cookies.
Individual offer scripts in Full presentation and Compact card formats also display content without a logo or footer. Button only remains a button. Previously copied scripts receive this change on the next page load; the public link retains the complete page with logo and footer.
Offer visibility on Google
Published offer pages and the catalog can be discovered by search engines when accessible on a public domain. Local addresses and private previews are not intended for Google; embedded versions are excluded from indexing.
- Use a clear title and original descriptions explaining the offer, terms and intended audience.
- Link the catalog from your ISP website.
- Open Services → Settings → Public pages → Help Google discover your offers and select Copy sitemap.
- Verify the domain shown in the link in Google Search Console and submit the sitemap under Sitemaps.
- Use Search Console URL Inspection to see the actual status of your pages.
The sitemap includes all published offers for active services available separately, including offers excluded from the catalog. It includes the catalog only when published. Drafts, suspended pages and unavailable services are excluded. Publishing and suspending pages updates sitemap inclusion; Google may take time to update search results.
Subsequent catalog pages have navigable links even without JavaScript. The sitemap uses the public domain configured for the ISP. After a domain change, update the property and sitemap in Search Console. The domain administrator must allow search engines to crawl public offers while keeping private areas excluded.
Publishing and submitting a sitemap do not guarantee indexing, timing or ranking. You do not need to share Google credentials with ISP Billing to use the sitemap link.
Contact requests: receipt, statuses and notes
Open Services → Requests to find Requests from your offers. This page collects contacts from public offer pages and forms embedded in your website. A three-step guide reminds operators to receive the request, contact the person and update its status and notes.
Before any requests arrive, the page explains how to publish and share an offer. Manage offers opens the service catalog for operators with write permission; Configure catalog opens Public pages settings for full administrators with write permission. When a search returns no matches, change or clear its filters: this does not mean no requests have ever been received.
The full contact form remains hidden until the visitor selects Request contact. They then provide name, email and phone, and confirms reading the privacy notice and requesting a callback. Company, message and address, where shown, are optional. A request does not activate services or automatically create a contract or customer record.
The description also has a We’ll call you panel with an always-visible form requesting name, phone and privacy confirmation. Its Let’s talk heading includes a support illustration on a light background, with accents matching the offer colours. On phones it appears below the description. Email and coverage checks are not required: Request a call submits a simple callback request linked to the offer, without attaching an address or coverage result. The panel remains available when there is no description. In the full embedded presentation its button opens this form on the offer page. Preview mode does not submit requests. After a successful submission, both forms on the page confirm receipt and prevent another submission from the same page.
Open Services → Requests. A soft orange badge beside Services reads “1 richiesta” or “2 richieste” (request/requests); the Requests submenu shows only the number. The count includes Waiting requests, including both the full form and We’ll call you. Opening a request does not clear the badge: change its status after handling it. The count updates when a page loads and after saving a status change; it disappears at zero and shows 99+ above 99 requests. It is visible to operators with service read permission and includes only their own ISP. Filter by offer, name, email, source and status, then open the request number to inspect contact details, message and history. The source distinguishes We’ll call you from the full form and identifies visitors from the public page or embedded presentation. Simple requests are labelled Callback request in the detail; email and address are not required. Operators with service read permission receive an internal notification. An existing customer is linked only when the requester was signed in as that customer.
Requests start as Waiting. Choose Contacted after contacting the person, or Unsuccessful with a note explaining the outcome. Requests can return to Waiting. Internal notes remain in the history with operator, date and status changes. For example: “Customer contacted; call again on Friday to confirm the address”.
If another operator has updated the request, reload before saving. If the public form expires or the privacy notice changes, reload and complete it again. Repeated submissions within a short period may require waiting a few minutes.
Coverage on connectivity offers
When a service is classified as a connectivity service and Coverage Map is active, visitors can use Check coverage and search town, street and number. The coverage section appears directly after the introduction and prices, before the details and callback panel, including in the full embedded presentation. The page gives one outcome for the technologies associated with the offer, without listing other technologies found at the address.
For example, with FTTH technology and an offer named “Home Internet”, a positive result states that the address has FTTH coverage and that the visitor can request the Home Internet offer. If only FTTC is found, the result states that FTTH coverage is unavailable. The commercial offer name remains distinct from the technology.
After the outcome, Request contact opens the contact fields. On the main page, the searched address and only relevant technologies accompany the request. A new search hides the form without clearing contact details already entered. The operator must confirm availability and terms before proposing a contract.
Visitors may request contact after a negative result or a temporarily unavailable check. If no technologies are associated with the service, an operator review is requested without claiming positive coverage. Without Coverage Map, visitors can open the contact form directly and provide an address.
The full embedded presentation shows the same offer-specific result; requesting contact opens the offer page. To attach a coverage result, perform the check on the main page.
Catalog items and customer service instances
The catalog stores commercial templates prepared by the ISP: offer name, type, reference price, billing cycle, tax rate, and required configuration. Assigning one of these templates to a customer creates a service instance.
The instance stores the actual values for that customer, including operational status, address, quantity, price, discount, tax, payment mode, contract, and module-specific data.
Configure the customer instance
A customer service instance combines the selected catalog offer with customer-specific cycle, quantity, recurring price, VAT, payment method, address, dates, and operational state. Review every inherited default and change only values justified by the customer agreement.
A newly created instance can remain Processing until technical and administrative prerequisites are complete. Commercial creation does not equal activation, and billing must not start before the intended readiness conditions have been met.
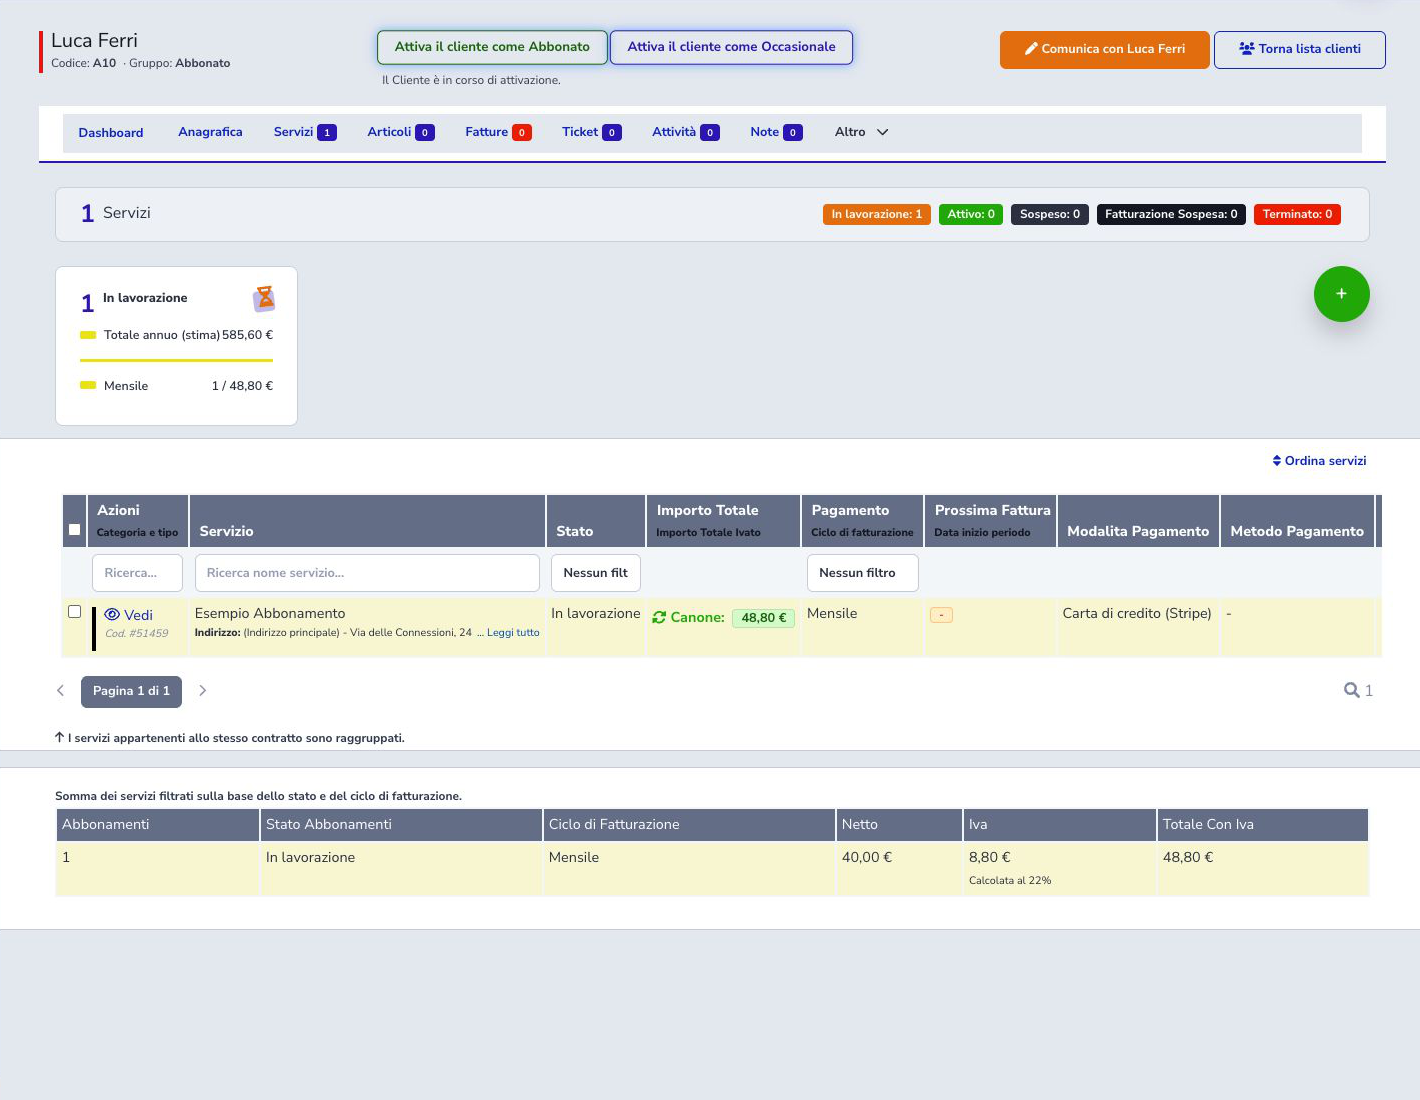
Open customer services
From the customer record select Services. Counters separate Processing, Active, Suspended, Billing suspended, and Terminated services. The page also provides an estimated annual value and cycle summaries.
The table includes instance code, service, address, status, fee, cycle, next invoice, payment mode and method, quantity, net amount, discount, VAT, total, contract, and relevant dates.
In the Actions column text filter you can enter a service group, category, type, or instance code. In the cross-customer instance list, the Customer column also displays the customer group and its text filter searches both customer details and group. Use both filters together to find a specific service-group and customer-group combination.
Normal search separates words. To search for one complete consecutive phrase, wrap it in percent signs, for example %POP 3%. This syntax applies a LIKE search for the phrase within each relevant field, so POP cannot match the group while 3 matches an unrelated instance code.
Create a new service
Select Create new service. You can choose a bundle or add one or more services using tabs. Each tab represents a service that must be configured before saving.
Select an offer that matches both the commercial agreement and available technical prerequisites.
Module prerequisites and validation
A service may require module-specific data, such as a Radius account. If the customer does not have the account yet, the instance can still be saved with Processing status. This lets the operator complete the commercial setup first and attach the technical prerequisite later from the service detail.
All required module fields must be configured before activation. If one is missing, ISP Billing blocks the transition to Active and identifies the data that must be completed before service and billing can start.
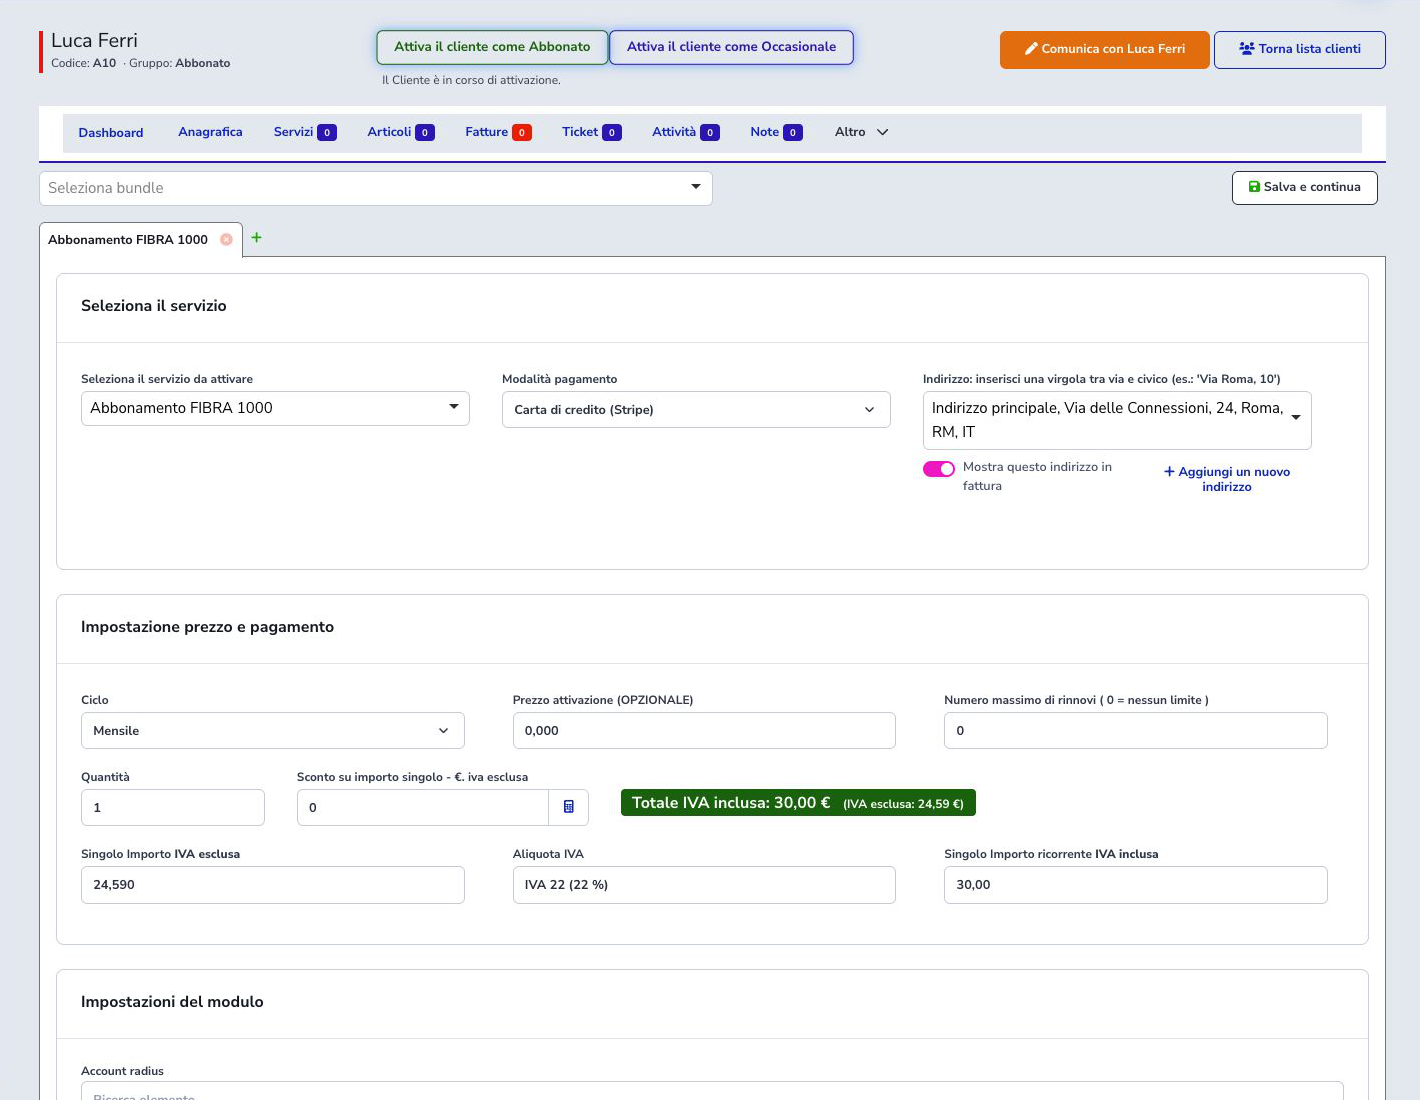
Payment mode
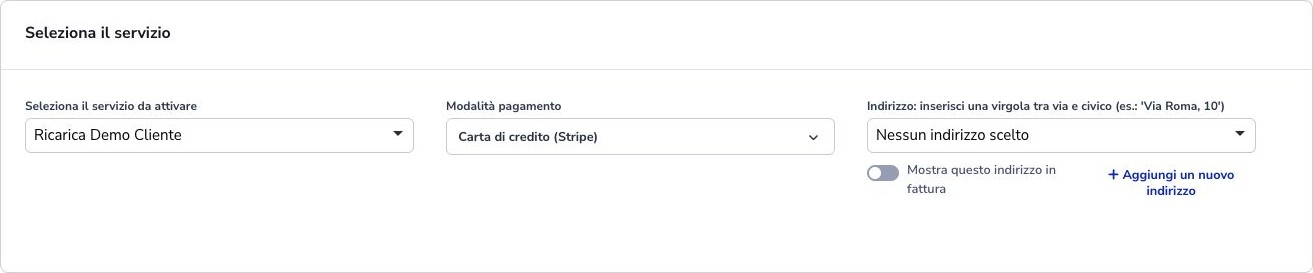
The form can offer Credit card (Stripe), Bank transfer, Card debit (Stripe), Direct debit (SEPA), SEPA debit (Stripe), Cash, Postal payment slip, and other methods configured by the ISP.
A listed mode does not mean that the customer has already authorized automatic collection. Saved cards, mandates, provider-customer association, or additional setup may still be required. Verify the method in the customer profile and payment gateway before enabling automated billing.
Service address
Attach the correct service address and enable Show this address on invoices when the installation location must appear in documents. Use Add a new address when the service is delivered at another location.
Give additional addresses recognizable labels and verify street, number, postcode, city, province, country, and any coordinates or coverage information required by the selected service.
Cycle, quantity, renewals, and activation fee
Cycle sets recurrence. Available values depend on the offer; the example is Monthly. A maximum renewal value of 0 means unlimited renewals. Quantity multiplies the single amount.
The optional Activation price is separate from the recurring fee. Verify whether it should be billed once and which tax treatment applies.
Price, discount, and VAT
The interface shows the single net amount, VAT rate, and recurring gross amount. The documented case uses €40.00 net, €8.80 VAT at 22%, and a €48.80 recurring total.
The discount applies to the single net amount. Recalculate after changes and verify net and gross values together with quantity and VAT.
Save the service
- Select the correct service.
- Set payment mode and address.
- Review cycle, renewals, quantity, and activation fee.
- Verify net amount, VAT, total, and discount.
- Complete any module-specific data already available; missing values can be attached from the detail while the service is Processing.
- Select Save and continue.
- Before activation, complete every required module field reported by the system.
ISP Billing displayed Service activated successfully and returned to the list. The new instance received code #51459 and Processing status.
Read the list and summaries
The Services counter changed from 0 to 1 and the summary reported one Processing service. The annual estimate is €585.60, equal to twelve monthly charges of €48.80.
The bottom summary separates net, VAT, and gross totals by status and billing cycle.
Service details and status
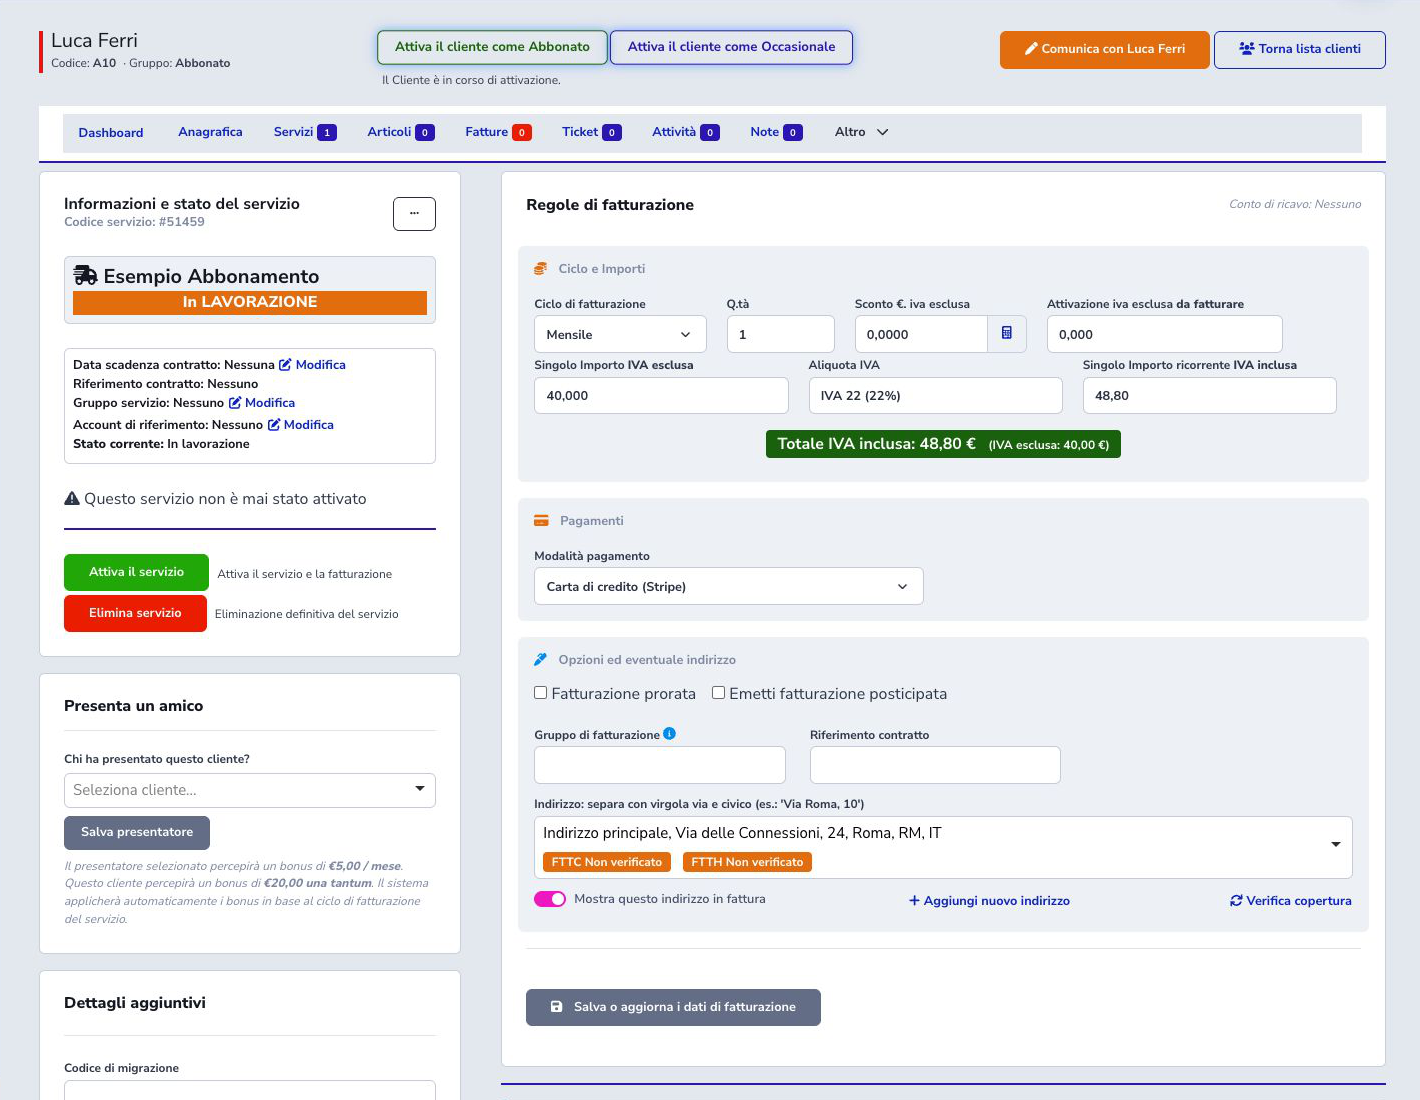
Open View to access instance details. The header shows code, name, status, contract expiration, contract reference, service group, and reference account. The documented service states that it has never been activated.
While the service is Processing, module-specific data can be completed or corrected, including the Radius account association. Activate service starts both the service and billing and checks all required prerequisites again. A missing field blocks the transition with an explicit message.
Bulk activation and contract references
The customer service list can activate several Processing services together. Before continuing, review payment mode and method, billing group, contract reference, service group, and dates. Contract activation date appears at the start of the procedure, defaults to today, remains editable, and is applied to every selected service.
Contract reference suggests the customer’s non-cancelled contracts while still allowing an operational reference to be typed. Billing group accepts letters, digits, spaces, and descriptive characters up to 20 characters; repeated spaces are normalized and the value is stored in uppercase in both single-service editing and bulk activation.
Default purchase costs and bulk update
In the service catalog, Manage purchase prices stores the supplier, cycle, and VAT-exclusive price proposed for new instances. Save these values on the service before using Bulk update existing instances.
The modal displays the saved values as read-only information and only asks which update rule to use. With Update only when data is missing or price is ≤ 0, the operation completes non-terminated instances having at least one missing purchase value or a non-positive price. When the rule is disabled, the saved values overwrite every non-terminated instance. Always run Preview first to review considered, updated, and excluded instances.
Service billing rules
Details allow you to review revenue account, cycle, quantity, discount, activation amount, net price, tax rate, recurring total, and payment mode. The net euro discount is rounded to three decimal places, including when calculated using the percentage button. The calculator accepts percentages from 0 to 100, including decimals: 100% reduces the recurring charge to zero. It requires a positive unit price. A discount entered directly in euros must also be non-negative and cannot exceed the net unit price; invalid values prevent saving. In the button beside the field, alongside the calculator icon, a compact percentage such as ≈ 15% shows the equivalent discount on the net unit price and updates as the price or discount changes. Hover over it for the explanation; the recurring VAT-inclusive amount label uses muted text. It is approximate because it is derived from the rounded amount; the original percentage is not retained. Changes are recorded when you save the billing details.
Additional options include prorated billing, billing in arrears, billing group, contract reference, and service address. These affect when and how charges are generated and must follow the ISP’s agreement and accounting rules.
Additional detail functions
The page can associate a referrer and bonuses, save a migration code, assign a reseller, link products, check coverage, and manage contract or service-group references.
Delete service is a permanent deletion and is different from suspension or termination. Do not use deletion to represent a commercial termination that must remain in history.
Statuses and operational consequences
- Processing: created but not yet operational; the Dashboard warns that it will not be billed.
- Active: operational and billed according to its rules.
- Billing suspended: an administrative billing block.
- Suspended: service delivery is suspended according to the configured workflow.
- Terminated: retains the history of a completed service.
Read the action description and billing consequence before changing status.
Configure a rechargeable catalog service
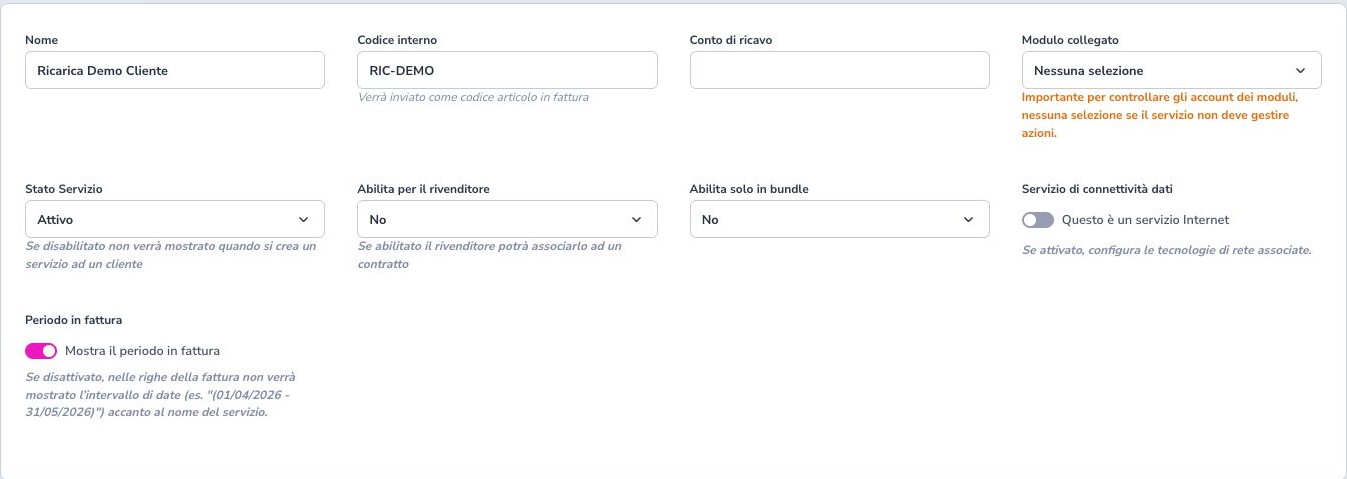
Open Services module → Settings → Services and create a dedicated model. Enter a customer-facing name and an internal code for invoice lines. Keep the catalog item Active; enable reseller or bundle availability only when those sales processes actually use it.
A linked module is unnecessary for a purely administrative recharge. Selecting Radius, VoIP, or another module may make the corresponding technical account mandatory during assignment. The verified model therefore used No selection. Enable invoice-period display when the purchased date range must appear on the document.
Payment type, VAT, and purchasable cuts
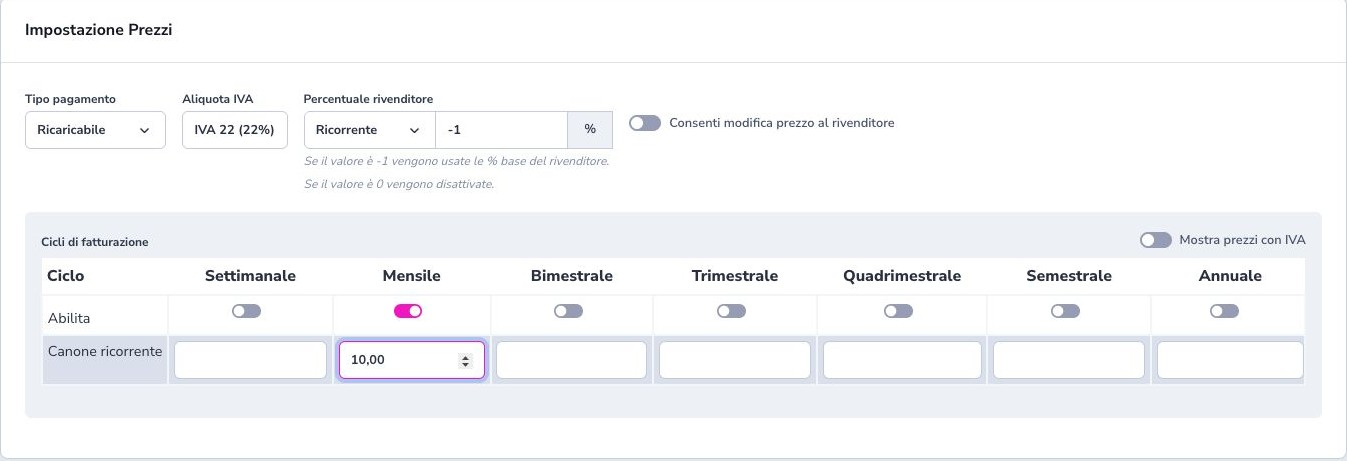
Under Pricing settings, select Rechargeable, choose the VAT rate, and enable only the billing cycles customers are allowed to buy. Each active cycle becomes a separate cut in the Customer Area.
The example exposes only a monthly cut at €10.00 net and 22% VAT, producing a €12.20 customer price. A disabled cycle is not purchasable. A reseller percentage of -1 inherits the reseller default, while 0 disables it; verify this before partner sales are enabled.
Assign and activate the customer recharge
From the customer record select Services → Create new service, choose the rechargeable model, and set a payment mode supported by the generated document. The new instance begins in Processing with a current value of €0.00: the catalog price is the purchasable cut, not an amount already accrued.
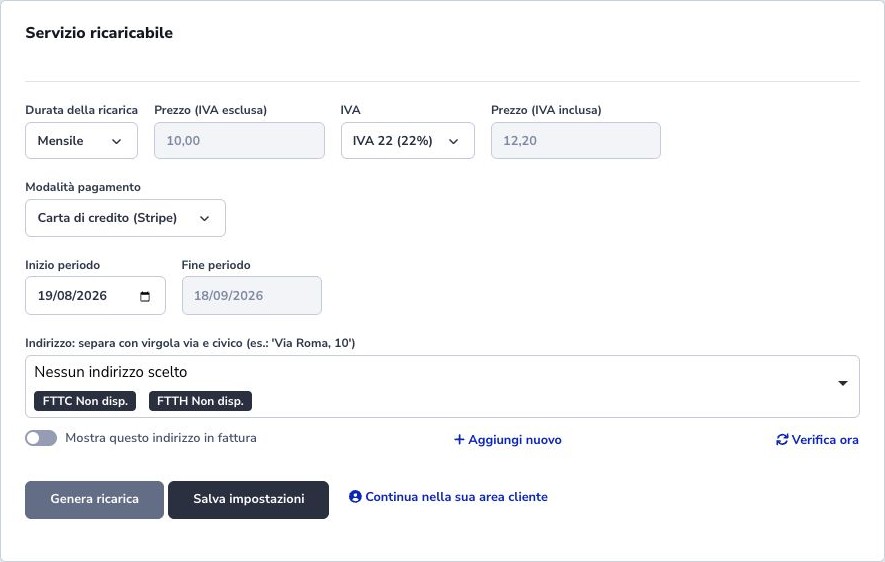
Open the instance and activate it only when the customer should be able to recharge. The administrative panel then shows duration, net and gross price, VAT, payment mode, and period dates. Generate recharge creates the document administratively; Continue in Customer Area opens the self-service path.
Recharge dates and generated documents
The first purchase starts on the chosen date and ends at the end of its cut. Once a paid period exists, the next recharge must start on the following day; the customer cannot overlap periods or backdate the purchase. The verified 19 August–18 September 2026 period caused 19 September–18 October to be proposed next.
Confirmation first creates a recharge proforma. A pending recharge document must be completed or cancelled before another is generated. Creating the proforma alone does not extend service: the payment must be recorded and the service end date must change.
Recharge expiry reminder on WhatsApp
The customer receives a reminder with the service name and recharge end date. The customer notification preferences must enable Invoice alerts for WhatsApp with a valid recipient number.
When using Official WhatsApp Meta, an enabled number and the Service expiry reminder template configured and approved by Meta are required. If the template is missing or not approved, contact support to complete its configuration. The reminder invites the customer to renew: the service period is extended only after the recharge payment.
Guided service change and customer counters
In Settings → Manage services, the Service customers column highlights the total number of distinct customers, including those with terminated services. When customers have multiple assignments, the assigned-service count is also shown. Only states with assignments appear below as clickable labels: Active, Processing, Suspended, Billing suspended and Terminated. Each state occupies a full-width row with single-line text showing the customer count and, when different, the assigned-service count. Colors match the customer service summary: green for Active, orange for Processing, grey for Suspended, dark for Billing suspended and red for Terminated. Zero-count states are hidden; a service with no assignments shows only No customers. A customer can own several instances and appear in several states, so customer counts by state are not additive. Open a state to view its instances.
Change service opens six mandatory steps: services, customers, terms, fields, preview and results. Successful intermediate checks proceed directly without an extra OK. Errors remain visible, and final confirmation is still required before executing the change. Catalog, billing information and custom-field write permissions plus customer read permission are required. The change includes every non-terminated instance of the service, without status or individual-instance selection, including operations with more than 500 instances. Active, suspended, billing-suspended and processing instances each retain their current status. The only optional filter is Customer type: All, Private individual, Business, Public administration or Association. Name search is for consultation only and does not limit the change. Terminated instances remain excluded.
The two services must use the same payment type and technical integration. Existing accounts, phone numbers and technical configuration are preserved automatically, without an additional choice. A change from no module to Radius or VoIP is also allowed: only in this case does a required checkbox appear to acknowledge that accounts or phone numbers must be assigned manually in each customer instance. The commercial change alone does not make connectivity or telephony operational. Changes between different integrations or from a linked module to no module are not allowed.
Terms, mandatory field mapping and change history
To change one assignment, open the customer service and choose Change service in the three-dot menu below Transfer ownership. The command is available to operators with service-change permissions for services that have not been terminated. The same wizard opens with the previous service already set: choose only the new offer. The Customer step shows only the selected instance, with no customer-type filters; the preview and confirmation identify its service number. Other services belonging to the same customer or other customers are not included. The link at the top returns to the customer service. Bulk changes remain available from Manage services.
The change updates the existing customer instance without terminating and recreating it. Status, next invoice date, payment method, billing cycle, VAT, quantity, dates, renewals, activation charges and existing technical associations are preserved. Suspended services remain suspended. A scheduled termination does not block the change: the termination date remains unchanged on the new offer. Earlier previews reporting this block must be prepared again. Several services owned by the same customer can move to the new offer, even if the customer already has that offer: every assignment retains its own identity and data. Earlier previews reporting a multiple-assignment block must be prepared again. Explicitly choose whether to keep each individual price or use the new catalog price for the same cycle, and whether to keep or reset the discount.
The change is immediate. The selected price applies to the next invoice still to be created, including accrued postpaid periods. Existing documents, including drafts, remain unchanged. Subsequent recharges use the new catalog cuts; keeping the old price is only possible when both price lists match. The expiry date of the purchased period remains unchanged.
In Fields, both service names clearly identify the source and destination. Each previous field appears on the left with its type and rules, using the same icons as the service details: administrator-only access, required status and invoice or quote visibility. The menu on the right lists existing destination fields with each name and its rules on separate lines; choose the field that will receive each customer’s own value. Names may differ: for example, Line code → Access identifier. Every previous field must have a destination, and each destination can be used only once; release an occupied destination before reassigning it. Incompatible fields remain visible but disabled, with the reason shown: a different type or missing administrator-only restriction. Administrator-only fields must retain their restricted visibility. Each instance value must satisfy the destination format, options and required status.
If a destination is missing, choose the final option Create the same custom field: the previous field’s name, type, options, validation rules, required status, visibility and default value are copied. Archived previous fields are included. Names of fields to create cannot be empty or duplicate new service fields: map an existing field or correct names in the service settings. The new service is limited to 100 fields in total. Other unmapped destination fields appear separately and are explicitly identified as fields of the new service: enter a shared value, or choose Empty only for optional fields. Keeping a field only in history is no longer an option: all previous fields must be transferred.
The preview lists mappings and marks missing fields as to be created on confirmation. Explicitly confirm their creation: they are added to the catalog only at final confirmation, once, and become available to other instances of the new service with the same settings, including required status. Values are copied only for instances included in the change; other instances are not filled in. Created fields remain in the catalog even if some instances fail to complete the change. Incomplete mappings, incompatible values or values without an identifiable previous field prevent the affected changes. Confirmation is required even when no custom fields exist.
Review the preview and open Compare for the terms and values of each instance. Enter a reason and confirm the change: final confirmation automatically shows the number of affected services without asking you to type it. The customer instance shows a note with the date of the latest successful replacement and the previous service name. Clicking the note opens the Customer log filtered to replacements of that same instance across all dates, including earlier years. Show all logs removes the filter. The change description uses separate lines for the previous service, new service and reason; long text wraps within the column. Every replacement is recorded in the Customer log with a link to the instance, the old and new service names, reason, date and operator account. Terms and field comparisons remain available in the wizard operations. Password values remain masked.
Blocked instances and change results
A pending recharge, linked Wholesale order, unfinished operation or incompatible technical conditions can block an instance. The preview explains why in the Indications column, where the full message wraps across multiple lines for readability. Correct the issue and prepare a new preview or explicitly confirm the exclusion of blocked instances. Every ready instance is included. Missing required fields are never ignored.
Preparing a preview does not change customer services. Progress is shown, for example 350 of 900 checked, and preparation proceeds automatically until the preview is ready. Resume preparation appears only if preparation remains incomplete and is available within 24 hours of starting. Included services are fixed at the start; later assignments require another operation. An instance that becomes unavailable is marked as blocked instead of disappearing. Final confirmation is available only after the entire preview is ready. If preparation is interrupted, reopen the operation to resume it; contact support if the issue persists.
If the catalog or customer data change after the preview, the affected change is not applied and requires a fresh preview. Unconfirmed previews expire 30 minutes after preparation finishes. During execution, progress shows processed instances out of the total, completed changes and any errors. After confirmation, execution continues to the final result. Completed operations show only their outcome and details, with no Pause or Resume controls. Resume processing is available only when execution remains incomplete; completed services are not processed again. Confirmed changes lists started or completed changes and omits unconfirmed previews. After 24 hours from confirmation, remaining instances require a new operation. Always review completed, excluded, failed and pending counts. Returning to the previous offer requires a new change and a new preview.
Correcting the termination date
The Service information and status panel separates each item with compact alternating rows, labels and values on the same line, and edit actions aligned to the right. Each action shows its button on the left and its description beside it, with text wrapping within its own column. In the customer service details, a terminated service shows Current status: Terminated and a separate Termination date row. With CRM write permission, select Edit next to the date: the field opens in the billing section, just like activation and expiry dates. Choose the correct day, enter the Reason for correction and select Save changes below the correction fields. The button appears only when you open Edit and is hidden when you close that section. For a terminated service, this save only corrects the termination date; billing rules remain locked.
You may choose today or an earlier date, provided it is not before the initial activation of the service. A later reactivation does not prevent this administrative correction. A reason is required, up to 1000 characters. For example, a termination recorded on September 29 may be corrected to September 25 if the service was already active. For a future cessation, use scheduled termination on the still active service.
The correction leaves the service terminated: it does not repeat technical deactivation, change scheduled termination or recalculate invoices already issued. Reports based on the cessation date may reflect the corrected day. If the service or date has changed in the meantime, reload the details before trying again.
The Customer log retains the service, previous and new dates without a time, reason, operator and actual time of the correction. Changes to activation, contract expiry and reference, service group, reference account, status and scheduled termination made through the corresponding service detail actions are also recorded. Saving unchanged values does not add a new entry. The log date remains the time of saving even when correcting a date in the past.
Applying order details to multiple customer services
For public administration, business and association customers, open a service that has not been terminated and fill in Optional extra data → Purchase order details (CIG - CUP). With permission to edit billing details, select Apply to customer services to copy the contract date, project/agreement code, PA/MEPA order number, CIG and CUP. The command uses the currently entered values, even before the normal form save, and saves only order details for the selected services.
Choose All non-terminated services or select one or more billing groups and contract references, including No group and No contract reference. Billing groups are separate from service groups. When every service has neither a group nor a contract reference, all non-terminated services are preselected. Selecting both groups and references includes only services matching both criteria; multiple values within one criterion are alternatives.
For example, select the Sites billing group and Agreement A reference to update only services matching both. Select only No group to include services without a billing group, regardless of contract reference.
Show summary lists affected services, copied fields and previous and new values. Searching by service code in the table only helps review the summary and does not narrow the operation. Filled fields replace existing values; empty fields preserve destination values. The currently open service is included only if it matches the selection. Review the summary and select Confirm and apply. Prices, billing rules and existing invoices remain unchanged. The customer log records actual changes, previous and new values, operator and date.
All statuses except Terminated are included: active, suspended, processing and billing-suspended. Copying order details preserves each service status. Terminated services remain excluded. If service status or data change while preparing the operation, reopen the summary. Summaries expire after 15 minutes. Each operation supports up to 1000 services; use more specific groups or references for larger selections. Fill in at least one field. No update is needed when all values already match.
General module settings
Before building the catalog, open Services module → Settings → General. Review the shared billing, suspension, termination, and alert rules because they can affect many customer instances. Record who may change them and validate every change on a sample service.
Service types and categories
Types classify the technical or commercial nature of a service and may determine which data, provider, provisioning path, or controls are required. Categories organize the catalog for operators and help separate connectivity, voice, managed services, equipment, and other offer families.
Create stable, clearly named, non-duplicated classifications before building offers. Review every referenced catalog item and customer instance before renaming, merging, or deleting them; a classification change can alter filters and operator interpretation without changing the underlying service.
Service bundles
A bundle groups several catalog services into one commercial proposal while preserving the configuration needs of each component. Define a clear bundle name and select only compatible items whose linked modules, prices, VAT rates, cycles, quantities, addresses, and prerequisites have already been configured.
During customer assignment, complete every component tab rather than assuming the bundle supplies missing technical data automatically. Verify the combined recurring and one-off price, discount behavior, payment method, activation dates, billing alignment, provisioning result, and how suspension or termination of one component affects the others.
Automation settings and configuration test
The linked module and its fields define technical automation. Configure the provider first, attach only the required fields, and use Test automation in the sample environment before publishing the offer. A successful catalog test does not replace checking the customer instance, remote account, profile, address, credentials, and identifiers.
Bulk wholesale-availability updates can change many sellable offers. Apply narrow filters and review the affected count first.
Inventory, forecasts, and exports
The Instances page is the cross-customer service inventory. Filters and aggregates cover status, offer, cycle, payment mode, amounts, and upcoming dates. Revenue forecasts and next-billing summaries are management aids; reconcile services that are processing, suspended, terminated, or excluded from billing.
Exports are prepared in the background as temporary files. Preserve the filters and verify row count and filename before downloading.
Margins and unbilled services
Margin reports analyze revenue and cost by supplier, service, and instance. Validate sales price, wholesale cost, quantity, discount, VAT, and period before using the result commercially.
The Unbilled services view highlights instances that did not produce the expected document. Check status, activation date, next invoice, billing suspension, cycle, renewals, group, and already-prepared documents. Do not create a manual invoice until the cause is known.
Suspension and termination widgets
Upcoming-suspension and upcoming-termination widgets are control queues. Open each service and verify contract, collections, and tickets before the deadline. After processing, reconcile the local status, technical provider, and communications; appearing in a widget does not prove that a remote action succeeded.
Scheduled service lifecycle
Scheduled processes cover invoice generation, suspension, Radius suspension retries, termination, termination-ticket creation, and rechargeable-expiration alerts. Configure the required schedule and monitor outcomes, logs, and working queues.
A Radius retry only completes a failed technical action. A termination ticket creates operator work and is not proof of decommissioning. A recharge alert warns the customer but never extends the period without a valid payment.
Catalog and instance APIs
APIs expose authorized catalog reads and service-instance operations, including the supported simplified creation flow. Use least-privilege keys, same-ISP identifiers, and catalog-consistent values.
Test duplicate requests, missing fields, unknown customers or services, and insufficient permission. Store the returned identifier and make the calling system idempotent because retrying after a timeout can otherwise create duplicate commercial instances.
Best practices and checklist
- Start from the correct customer record
- Select an offer matching the contract
- Complete module-specific technical prerequisites
- Leave an unnecessary technical module unlinked for a simple recharge
- Enable only the cuts actually sold
- Verify payment mode and authorization
- Review cycle, quantity, renewals, and activation fee
- Recalculate net, VAT, discount, and total
- Activate only after operational verification
- Confirm both the paid document and the new recharge end date
- Use suspension or termination instead of deletion when history must be preserved